Connecting to the REST API:
Attention
This article does not describe all possible entity fields, a complete list is available in the documentation.
When using the API, your system must pass a simple basic authorization using administrator login and password, we recommend creating a special administrator in TMS for this purpose.
Below are examples of curl requests, the examples are for reference only, in real integrations you can use the handy http client of your programming language.
In real integrations, you need to consider possible loss of connectivity to the API, error handling, and other exceptional cases.
It is recommended to use the API to periodically synchronize your management system and TVIP TMS.
- HTTP methods:
GET - getting;
POST - create and modify;
DELETE - Delete.
When updating (changing) an entity, the json object can only contain the properties to be changed, fields that do not require changes can be omitted. When updating, it is necessary to indicate the id of the entity being changed in the json object; when creating the object, the id field is not used.
API authorization
When making calls to API methods it is necessary to use basic authorization, an example of its receipt and implementation is given below. It is important to set the Accept: application/json field in header.
 # get Login - password for authorization
 echo -ne login:password | base64
 bG9naW46cGFzc3dvcmQK

 # check by calling account list receiving method
c url -X GET --header 'Authorization: Basic bG9naW46cGFzc3dvcmQK' --header 'Accept: application/json' 'https://tms.example.com/api/provider/accounts'
Creating an account through the API
To create an account you need to generate json with account description, minimum data set required for the account:
- id:
user id in TVIP TMS, when creating a user, this parameter is omitted, when updating it is required.
- enable:
the property of the account that is responsible for the status of the service, if enable is set to false devices will be authorized, but services will not be available, this flag has to be used in your business logic to enable and disable the service.
- login:
username, unique within the provider, used to authorize devices by the user.
- pin_md5:
md5-encrypted user password is used to authorize devices by the user.
- fullname:
user name, will be displayed by the devices after user login.
- provider:
provider id.
The successful result of the command is a json object that contains all client properties including id of the user, this id will be used in the next steps.
Example of sending a request to create an account using curl:
curl \
--location \
--request POST 'http://tms.example.com/api/provider/accounts' \
--header 'Authorization: Basic bG9naW46cGFzc3dvcmQK' \
--header 'Content-Type: application/json' \
--data '{
"enabled": true,
"login": "user",
"pin_md5":"25d55ad283aa400af464c76d713c07ad",
"fullname":"First name Last name",
"provider" : 212
}'
The response will contain a json structure containing the parameters of the created account:
{
"id": 4333,
"login": "user",
"remote_custom_field": null,
"fullname": "First name Last name",
"pin_md5": null,
"contract_info": null,
"main_address": null,
"account_desc": null,
"provider": 212,
"provider_dto": null,
"region_tag": null,
"region_dto": null,
"enabled": true,
"devices_per_account_limit": null
}
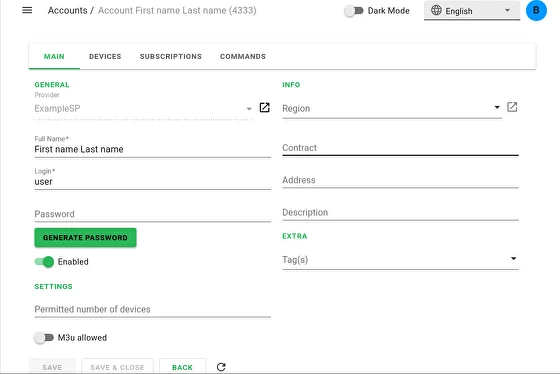
The result of the command can be seen in the administrator panel:
Adding a subscription to a user
Fields required to create a subscription:
- account:
user id in TMS (obtained in the previous step).
- start:
start date of the service.
- tarif:
tariff id for the service (you can create a tariff and specify its Id in the administrator panel).
Successful server response - json subscription object, the subscription id should be used to manage this subscription.
All client subscriptions can be obtained by :
/api/provider/account_subscriptions?account=4333
An example of sending a request to add a subscription using curl:
curl \
--location \
--request POST 'http://tms.example.com/api/provider/account_subscriptions' \
--header 'Authorization: Basic bG9naW46cGFzc3dvcmQK' \
--header 'Content-Type: application/json' \
--data '{
"account": 4333,
"start": "2020-05-19T00:00:00+0300",
"tarif": 69
}'
The response will contain a json structure containing an array of subscriptions:
{
    "start": "2020-05-19T00:00:00+0300",
    "stop": null,
    "tarif": 69,
    "id": 13592,
    "account": 4333,
    "tarif_dto": null,
    "account_dto": null
}
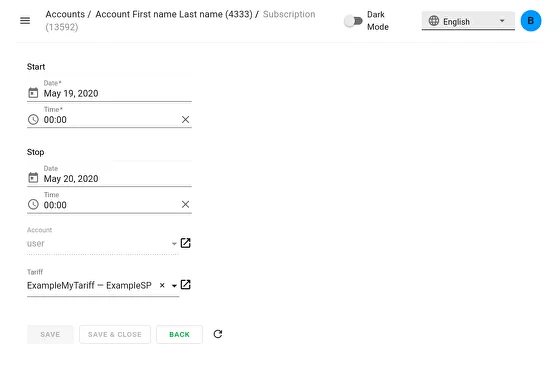
You can see the result of the command in the subscriptions section:

Subscription cancelling
To manage a subscription (for example, unsubscribe the user), you need to modify:
- id:
subscription id in TMS (obtained in the previous step).
- stop:
field for setting end date of the subscription.
An example of sending a request to unsubscribe using curl:
curl \
--location \
--request POST 'http:/tms.example.com/api/provider/account_subscriptions' \
--header 'Authorization: Basic bG9naW46cGFzc3dvcmQK' \
--header 'Content-Type: application/json' \
--data '{
  "id" : 13592,
  "stop": "2020-05-20T00:00:00+0300"
}'
The server response will contain a json subscription object with updated fields:
{
    "start": "2020-05-19T00:00:00+0300",
    "stop": "2020-05-20T00:00:00+0300",
    "tarif": 69,
    "id": 13592,
    "account": 4333,
    "tarif_dto": null,
    "account_dto": null
}
You can see the result of the command in your account settings:
After there are no active subscriptions in account, device reports this message. The same message will appear when account is disabled.

Account disconnection
By id of the user in TMS set the flag enabled: false. For example, using curl this can be done as follows:
curl \
--location --request POST 'http://tms.example.com/api/provider/accounts' \
--header 'Authorization: Basic bG9naW46cGFzc3dvcmQK' \
--header 'Content-Type: application/json' \
--data '{
"enabled": false,
"id": 4333
}'
The server response will contain a json object of the account with the updated fields:
{
"id": 4333,
"login": "user",
"remote_custom_field": null,
"fullname": "First name Last name",
"pin_md5": null,
"contract_info": null,
"main_address": null,
"account_desc": null,
"provider": 212,
"provider_dto": null,
"region_tag": null,
"region_dto": null,
"enabled": false,
"devices_per_account_limit": null
}
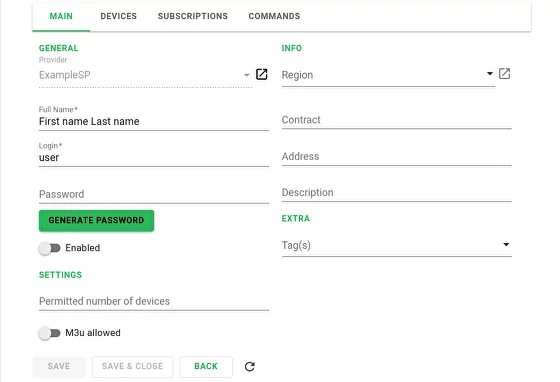
You can see the result of the command in your account settings:
Sending commands to devices via API
Using Provider API it is possible to send commands to client devices. To do this, you need to send a command request to the TMS server, after which the request will be analyzed and the command will be sent to the designated client devices on the TMS side via a web socket connection. The following commands are available for sending using the Provider API:
- user_message:
Sending messages to client devices. It is possible to send both simple messages and messages that require confirmation of receipt from the user.
- refresh_channel_list:
Used to update the channel list on the device: after receiving this command, the device, using the TVIP API, requests from the TMS the list of channels available to it via the channles.json endpoint.
- reinit:
Re-initialize device on TMS server - when the command is executed, the device re-authenticates, requests information about the server, account and list of available channels.
- restart:
Restart the Tvip Media Center. Sending to other types of client devices will be ignored.
- switch_to_channel:
Switching the channel on the device.
In general, the URL for sending commands is as follows:
POST https://<tms_server>/api/provider/commands/send/<recipients>?broadcast=false
where <tms_server> is the domain name of the TMS server, and <recipients> is the message recipient class, which can be one of the following:
providers - used if you want the command to be executed for all subscribers associated with a particular provider (or several).
accounts - used if it is necessary to execute the command for all devices of a specific subscriber (or several).
devices - used if you want the command to be executed for a specific device (or several).
The generalized body of a command send request is as follows:
{
  "ids": [
    <ids>
  ],
  "commands": [
    {
      "command": "<command_name>"
      ...
    }
  ]
}
In the query body structure, the main attributes are the ids and commands arrays.
The ids array contains the identifiers of the entities whose class is selected as the recipient in the request URL. Thus, it instantiates the list of those to whom the command is sent. For example, if accounts is specified as the recipient in the request URL and the ids array lists the identifiers 2, 6, 51, then the command will be executed on all client devices associated in the TMS with accounts whose identifiers are 2, 6, and 51, provided that these devices are connected to the TMS at the time the command is sent. But if devices is specified as the recipient in the request URL, then with the same identifiers listed in the ids array, the command will be executed only on devices with identifiers 2, 6, 51 (also provided that there is a connection between them and the TMS at the time the command is sent).
The commands array contains objects of commands sent to the client device, so that the body of the request can contain one command or several. Each such object contains command name, and its application parameters:
- command:
Command name.
- type:
The type of message to be sent is notfy or confirm. The property is relevant only for the user_message command.
- post_time:
Time in the format YYYYY-MM-DDThh:mm:ss GMT not earlier than which the command should be sent to client devices. The property is relevant only when the command execution time is delayed.
- ttl:
The time no later than which the command should be sent to client devices.
Warning
Currently, when working with sending commands via Provider API, the ttl field should be filled in Unix timestamp format.
- text:
The text of the message to be sent to the user. The property is relevant only for the user_message command.
- title:
The title of the message to be sent to the user. The property is relevant only for user_message command with confirm type.
- delay:
Time in seconds during which the message is shown on the client device display. The property is relevant only for user_message command with notify type.
- channel:
Identifier of the channel to which switching is performed. The property is relevant only for the switch_to_channel command.
- use_as_push:
Controls whether messages sent will be displayed on devices as push notifications. The property is relevant only for the user_message command.
Example of sending a command to update the channel list
In this example, the command will be sent to multiple accounts whose TMS identifiers are 3 and 11. Let the domain name of the server be tms.example.com.
Since the command is to be executed for specific users, the endpoint of the request will specify accounts as the recipient class:
POST https://tms.example.com/api/provider/commands/send/accounts?broadcast=false
As mentioned above, the refresh_channel_list command is used to update the channel list. Since in our case the refresh_channel_list command should be sent immediately, the time of sending it is not specified and the only parameter is the name of the command itself. The body of the request to send this command will look as follows:
{
  "ids": [
    3, 11
  ],
  "commands": [
    {
      "command": "refresh_channel_list"
    }
  ]
}
In this json structure, the ids field is an array of entity identifiers whose class is selected as the recipient: in our case, these are user identifiers. Thus, the command to update the channel list will be received and executed by all client devices of users 3 and 11 that will be connected to the TMS websocket connection.
Here is how it looks like to send a request to execute this command with curl:
curl -X 'POST' \
  'https://tms.example.com/api/provider/commands/send/accounts?broadcast=false' \
  -H 'accept: */*' \
  -H 'Content-Type: application/json' \
  -d '{
  "ids": [
    3, 11
  ],
  "commands": [
    {
      "command": "refresh_channel_list"
    }
  ]
}'
If the request is successfully processed, a json object with a corresponding parameter will be received as a response from the server:
{
  "response": true
}
Example of sending a message to client devices
In this example, the message will be sent to all accounts associated with provider whose ID in TMS is 1. The message will require confirmation before closing on the client device. Let in our case the message should be sent after a specific time - for example December 31, 2025 12:00 GMT. Message header - “Dear subscribers!”, message text - “Happy Holidays!”.
Since the command must be executed for all provider users, the endpoint of the request will specify providers as the recipient class:
POST https://tms.example.com/api/provider/commands/send/providers?broadcast=false
In the body of our request to send a message, the ids array contains a single provider identifier. The commands array will contain a single command object - the user_message command is used to send a message to a user. In addition to the name of the command, the message type (type) must also be specified - since we are using a confirmation message, in this case its type will be confirm. A confirmation message also requires the text of the message (text) and its title (title).
Note
When sending a message of notify type, it is not necessary to specify the message title (title) in the command structure - if it is present in the request body, it will be ignored and will not be displayed on the client device.
In addition, in our case we need to specify the time after which the command should be sent to users (post_time). Thus, having filled these parameters with values corresponding to our conditions, we get the following body of the request to send messages:
{
  "ids": [
    1
  ],
  "commands": [
    {
      "command": "user_message",
      "type": "confirm",
      "title": "Dear subscribers!",
      "text": "Happy Holidays!",
      "post_time": "2025-12-31T12:00:00"
    }
  ]
}
Here is how it looks like to send a request to execute this command with curl:
curl -X 'POST' \
  'https://ms-test.tvip.ru/api/provider/commands/send/providers?broadcast=false' \
  -H 'accept: */*' \
  -H 'Authorization: Basic c2VnYWw6bkVmQzlkczQmZE5FXlFw' \
  -H 'Content-Type: application/json' \
  -d '{
  "ids": [
    1
  ],
  "commands": [
    {
      "command": "user_message",
      "type": "confirm",
      "title": "Dear subscribers!",
      "text": "Happy Holidays!",
      "post_time": "2025-12-31T12:00:00"
    }
  ]
}'
As in the previous example, the following response will be received as a response to a successful request:
{
  "response": true
}